Nothing negates the excitement of a newly designed or restructured website like your search engine rankings, traffic, and conversions tanking as soon as you hit publish, but it does happen. Of course, this is never intentional and is usually caused by a lack of either search engine optimization (SEO) expertise or previous experience migrating a website. What most marketers and web developers fail to consider when migrating a website is how search engines will react, and what the migration will do for ongoing organic performance.
Migrating a website, especially when it comes to SEO, isn’t a simple strategy that can be done in an afternoon or quickly thrown together a day or two before launch. An SEO migration takes rigorous research, planning, execution, and monitoring to ensure your post-launch site maintains and builds as much organic visibility as it can. It takes the resources of multiple teams, including your digital marketing, SEO, and web development teams, to make sure tasks are completed in a correct and timely manner.
Remember, the purpose of SEO migration is to prevent loss of your website’s search engine rankings, traffic, and conversions. By performing a stringent SEO website migration, you’ll maintain and hopefully increase your organic performance.
But before we get too far ahead, let’s start at what makes for successful site migration SEO and work our way down.
Table of Contents:
What is a website migration?
In a website migration, or site migration, a website undergoes substantial URL, structure, content, UX, design, or platform changes. It could be everything from updating the layout of your website to changing the URL structure, or moving your website to a new domain or content management system (CMS).
Types of website migrations:
- Protocol: Changing your website protocol from http to https
- Subdomain: Changing your website from “www.yoursite.com” to “newsubdomain.yoursite.com”
- Domain: Changing your website URL from www.olddomain.com to www.newdomain.com
- Top-level domain: Changing your website URL from a .com to a .org, .net, etc., or vice versa
- Content management system: Moving your website from your current CMS to a new one, for instance, moving from Wordpress or Joomla to the Umbraco CMS
- Redesign: Making modifications that range from small aesthetic changes to the website layout to a full website revamp with major code and copy changes
- Structural: Changing the website architecture or structure, which usually means changing either the user flow of a website or the URL structure on which the website is built
- Hybrid or combination: Using a combination of the above types of migrations
What is an SEO migration?
An SEO migration is a process of transferring search engine ranking, authority, and indexing signals to reflect a major change in your website or website URL structure. An SEO migration guarantees that you don’t lose any of your search engine visibility (rankings and traffic) when conducting a website migration.
Why do you need to consider SEO in a site migration?
Your site has built up organic visibility and equity over time that has resulted in you obtaining rankings for keywords and searches that your prospects and customers use to find your website. When you change your URLs, content, and website overall, you change what search engines know about your website and the metrics they’ve applied to it to give you your rankings. The goal of any website migration is to do so while mitigating traffic losses as much as possible; conducting a thorough SEO migration ensures that the losses won’t happen.
What happens if you don’t include SEO in your website migration strategy?
Simply put, you risk losing your search engine rankings, traffic and leads.
Here’s a Google Analytics screenshot from a prospect who came to us to help them regain organic traffic after a launch:
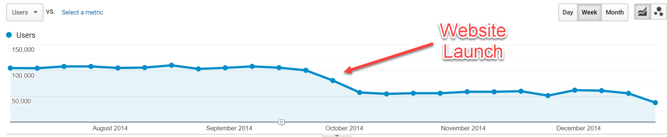
What you’re seeing is a 44% decrease in organic traffic post-launch, or roughly 500,000 users.
After an SEO audit and a Google Analytics audit, we found that this prospect had no real SEO migration strategy. In fact, they didn’t even account for SEO when they relaunched their website. This actually isn’t that uncommon — a lot of businesses relaunch their website out of sheer excitement and often leave SEO to the wayside. The result, of course, is the screenshot you see above: massive decreases in organic visibility and traffic.
How long should a SEO migration take?
The length of an SEO migration really comes down to the size of your website, how much of the content you’re moving, and the pre- and post-audits you need to conduct. A 100-page website is going to take substantially less time than a 1,000-page website, which will take substantially less time than a 50,000-page website, and so on. Some SEO migrations take a month to prepare and execute, while some take three months. It’s important to give yourself enough time to plan, develop a staging site, QA and audit, and then implement. We recommend allowing at least three months, to be safe. But, as always, it depends on you and your team resources — make sure you discuss it at length.
How much does a SEO migration cost?
SEO migration cost comes down to the size of the project. It depends on what kind of migration you’re conducting, how much content you need to migrate and develop, how many 301 redirects you need to set up, the overall size of the website, auditing of the staging site, and finally, implementation.
What we recommend is choosing an SEO expert or company that has previous experience in migrating a website with SEO in mind. It’s best to invest up front in a correct SEO migration instead of going the “cheap” route, and having to circle back and fix issues over and over again, stunting — or worse, damaging — your organic performance in the process.
Considering a Website Migration?
Don't lose rankings and authority. Our proven processes and expertise ensure a smooth, stress-free transition to your new site.

SEO Migration Checklist:
Since 2003, we’ve handled hundreds of website migrations for medium to enterprise level businesses. Over that time, we’ve developed a comprehensive SEO migration plan that helps keep migrations on track and completed on time, resulting in increased search engine visibility for our clients’ websites. Depending on the goal of the migration and how much time you have, all of the checklist items below can be applied to ensure a successful migration.
1) Plan the Migration
The first step in any website migration is planning. This involves setting clear goals for the migration, assembling a project team, and creating a detailed project timeline. Your plan should outline every step of the migration process, from backing up your current site to monitoring performance after the migration. It's also important to communicate your plan to all stakeholders and ensure all teams are in close communication and have a clear understanding of their role in the project. This is particularly important among your SEO teams, web developers, project managers, and content teams.
2) Pick a Smart Migration Date
Pick a launch date that works best for your team and website traffic. Take into account all of the work needed to make a reasonable project timeline. For instance, make sure you settle on your project goals; redesign and approval time; development work; content creation and updates; SEO migration tasks; and day-of-launch task items.
Pick a day and time when traffic and engagement is low, and preferably when your team is in the same office or room. As tempting as it sounds, try to stay away from weekends, which can lead to coordination and communication issues. Aim for afternoon or early evening launches in case troubleshooting or unexpected issues take you to the early hours of the morning, when traffic is low.
3) Back Up Your Site
Create a backup of your website so that if the launch goes sideways or not as planned, you can revert to your old site if needed. Sit down with your marketing and web development teams to develop a comprehensive rollback plan in the event that you need to go back to the old website to work out kinks for a successful website migration.
4) Create a Staging Website
A staging website is a duplicate version of your new website that users don’t see; this is where you can test changes you’ll make to your live site. By creating a staging website, you give your team ample time to not only revi3ew how the content looks and the website functions, but also to test and implement URL 301 redirects before going live. This means you’ll remove the need to update URLs in internal links and sitemaps multiple times before and after launch.
5) Considering Migrating in Phases
If you’re moving multiple properties or websites or multiple large sections of an enterprise site for your website migration, consider “chunking” this activity up in phases rather than moving everything at once. This strategy makes the process more manageable and makes it easier to identify troubleshooting issues before you go live.
6) Perform an Organic Health Check and Backlink Audit of the New Domain
If you're doing a domain migration, check the organic health of the domain to which you're planning on moving. Has it been penalized in the past for spammy backlinks or content? Are the current backlinks pointing to the website spammy or irrelevant? Look at metrics for the website, including Moz's Domain Authority. Doing so gives you an idea of the types of problems you could encounter in the long run on that domain.
You can also use a tool like Wayback Machine to see what content the old site actually contained (and make sure it wasn’t spammy pills, poker, porn-type, etc., content). This also allows you to see if the domain contained content topically relevant to your own — an ideal situation, since Google may then be familiar with the type of content to expect on that domain.
7) Crawl Your Site
Use Moz Pro or ScreamingFrog to crawl your website to get a full URL and content inventory of your site. You'll use this to not only fix issues on your staging website, but also to map old URLs to new URLs in your 301 redirect map. This also helps you prioritize which pieces of content to move over and what internal links need to be updated to reflect the new URL structure.
8) Prioritize the SEO Importance of Site URLs to Be Redirected
This is something we do at Marcel Digital for every single SEO migration, and we highly recommend you do the same. We first crawl your site to pull all URLs that live on your domain. Then we compile data about those URLs from world-class analytics and SEO data sources, including Google Analytics, Majestic, SEMRush, and more, to score which content on your website has the most search engine value. This is a proprietary scoring tool we've developed over 17 years called the SEO Migration Scoring Card, and it helps us prioritize content, 301 redirects, and more in a website migration.
Here’s a screenshot:
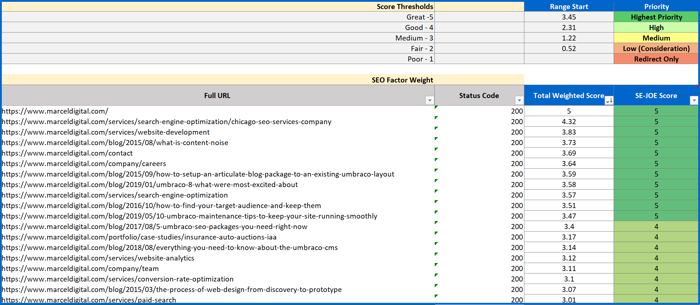
Doing this ensures high priority URLs are accounted for in your redirect file, and it can also help you find what content needs to be updated, consolidated, or removed altogether. Take the extra time to prioritize URLs on your website so that your most important content performs out of the gate in your migration, and missing or outdated pieces of content can be created or updated to get the most SEO visibility possible.
9) Implement 301 Redirects
Create a full 301 redirect map based on your SEO migration scoresheet and implement it on your website. This helps guarantee that the old website URLs redirect properly to their new URLs, and also that internal links redirect properly, in case you missed them. You'll want to crawl this map before you implement to check that no redirects are broken, and again post-launch to make sure everything redirects properly.
Here’s an example of what a 301 redirect file might look like:
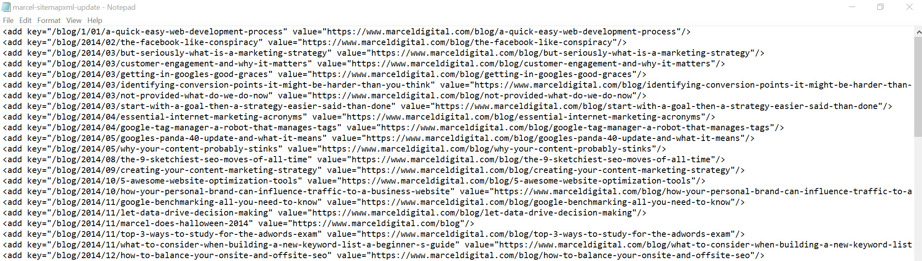
Simply create a column with your current/old URLs with another column that lists the new URL counterparts. The file type is completely dependent on your CMS and web developer preference, so be sure to speak with them before you develop a redirect file.
10) Update Internal Links
After you update your new URLs and have an inventory of what they’ll be, go to your test website and begin updating internal links to avoid having internal redirects or broken pages. You can find internal links using ScreamingFrog, including their anchor text and what pages they’re on.
11) Create a Custom 404 Page
You'll want to create an engaging 404 page that users see when encountering a broken page. This 404 page should help them navigate to your homepage or other pages on your site to find what they're looking for. Not having a 404 page leads to a blank page that users can't navigate from, causing them to leave your site altogether.
12) Update Google My Business and Bing Places
If you're updating your domain, make sure to also update your website link to the new domain in Google My Business (and other citation pages) and Bing Places. If you have multiple locations or offices, update the URL for those as well. If they have their own unique URLs (like www.yourdomain.com/location), this is especially important to update. Remember, optimizing your Google My Business listing is a key aspect of your local SEO strategy, and Google uses this data to verify your business and what searches to rank you for.
13) Update Your XML Sitemap
Make sure that all of your new URLs are accounted for, create a new sitemap XML that can be attached to your website (https://www.yourdomain.com/sitemap.xml), and upload it to your Google Search Console.
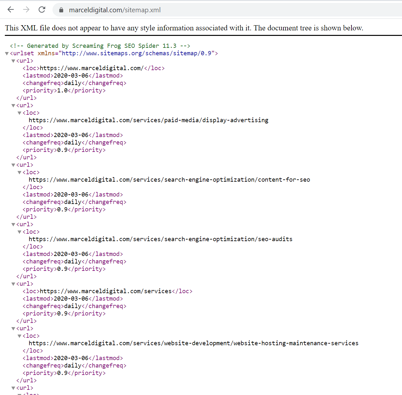
This helps Google and other search engines find your important service, product, or business information pages so that the new URLs can be indexed and returned in search results. Do this as soon as your site goes live, as Google is quick to notice these changes, and it’s crucial to get them indexed with traffic flowing to them!
14) Tell Google Search Console and Bing Webmaster Tools if You Changed Your Domain
If you update your domain, be sure to use the Change of Address feature in Google's Search Console. This tells Google that you changed your domain and that it can be found at the new domain URL. Also, use the Site Move Tool in Bing Webmaster Tools to notify Bing of your website move so it can start indexing your new URLs. You'll want to do this as soon as you launch your website.
15) Focus on Mobile-Friendliness
Google is mobile-first indexing, meaning they look at your website’s mobile experience first before indexing your website, even on desktop. Building a mobile-friendly website that renders properly across different devices and browsers ensures that your website ranks properly. Google and other search engines want responsive design, so don't build an entirely different mobile website — go responsive.
Not sure if your website is mobile-friendly? Google has a Mobile-Friendliness tool that assesses your website and provides you with recommendations to enhance the mobile experience, increasing your organic visibility in the process.
16) Migrate or Add Schema
In 2011, major search engines like Google, Bing, Yandex, and Yahoo! created a common set of data markup opportunities that webmasters can use to help their crawlers better understand the meaning of and information on a webpage. This collaborative markup is called Schema.org.
If you don’t have Schema implemented on your website, you should. While not considered a direct ranking factor, studies suggest it can help increase rankings and result in rich snippets, leading to higher click-through rates.
If you do have Schema or markup on your website, include it in your migration. You can migrate Schema in a number of ways, including:
Schema Being Copied/Pasted into Body Content
First find out if your Schema or structured data markup is HTML or Javascript based. At Marcel Digital, we prefer Javascript, as you have more control and can add more elements to it. Schema in Javascript looks like this:
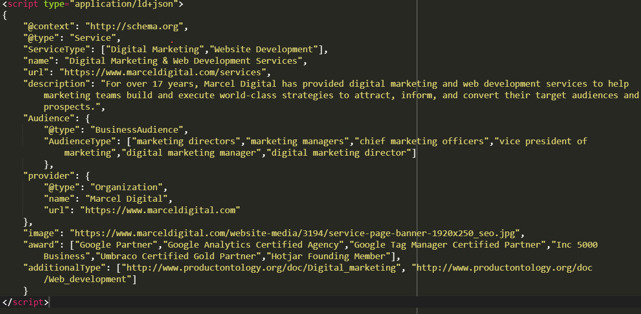
It can be implemented after the opening or before the closing <body> tag.
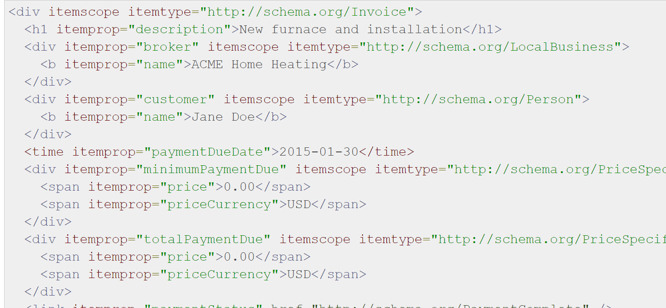
And HTML looks like this:
Sit down with your web development team and discuss what options are available to you and how you can best implement Schema through these two alternatives. From there, you copy over or update Schema to your preferred type and begin implementation, being conscious of URL, title tag, image, and other copy updates.
Schema Is Being Populated Through GTM
You can also place Schema through GTM — however we don’t recommend this, as Google advises against using Google Tag Manager to implement structured data markup. If you’d like to continue using Schema in Google Tag Manager, here is a resource you can reference to help.
Schema Is Being Implemented Through a Plugin
If you’re on Wordpress or moving to Wordpress, numerous plugins are available to help implement Schema on your website. We recommend taking a look at plugin options based on the CMS you’re either working in or moving to. Jooma offers numerous extensions to help, as does Umbraco. Research how your web development team can implement into your CMS so content editors can add to your site.
If the above options aren’t going to work, Google also offers the Structured Data Markup Highlighter to help those who are less code-inclined. It’s been a huge help for many prospects and clients. We suggest you try it out through Google Search Console.
17) Update Your Robots.txt
A robots.txt file tells search engine crawlers which pages or files the crawler can or can't request from your site and usually lives at www.yoursite.com/robots.txt. Make sure you update your robots.txt so that Google knows what parts of your website to crawl and not crawl. Add your new sitemap XML URL in there as well, so Google and other search engines can find it.
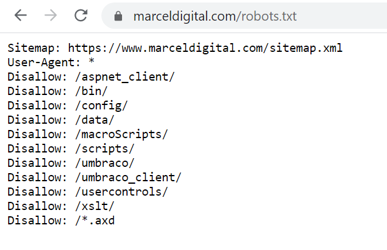
Also, be sure to submit your robots.txt URL in Google Search Console so that it's aware it exists and can crawl it.
18) Update Your Backlinks
No doubt your old website has backlinks pointing to it, especially if you have location pages or documents that are of value. Go to your Search Console, Moz Link Explorer, Majestic, or whatever backlink tool you prefer to see which pages are collecting backlinks. Then reach out to the websites linking to your own website and have the backlinks updated so that you can collect all that backlink equity. This will take time, so have someone keep track of these backlinks, cover outreach, and annotate in Analytics when a backlink is updated.
19) Keep Control of Your Old Domain
Keep control of your old domain so that you hold the domain name real estate and can ensure that all backlinks pointing to it are redirected properly. Letting go of that domain means someone else can take it over and create a site — and you lose your backlinks.
Instead, hold on to it and keep collecting all the search engine equity you've built for it over the years.
20) Perform a Pre- and Post-Launch QA and SEO Audit
Before and after you migrate and launch your website, conduct an SEO audit to confirm that all pages, content, links, tags, and mobile items are accounted for and in place. All SEO task items need to be in place before you hit “go” on your migration, and they need to be properly migrated with your site after the fact. To do this audit, you need to:
- Run a Crawl: Use ScreamingFrog to conduct a quick crawl of your website. Check for:
- Broken pages (4xxs)
- Redirects (3xxs)
- Broken images
- Missing meta tags
- Duplicate content
- No or incorrect canonical tags
- Pages not “noindex”ed
- Check Analytics: Check that Google Analytics and Google Tag Manager are both correctly installed on your website and collecting data. The quickest way to do this is to leverage the Real-Time Analytics report in Google Analytics because it gives you — you guessed it — real-time insights to those on your website right now.
- Test on Mobile: Pull out your phone and go to your website. First, make sure your website is responsive and rendering properly on your mobile device. Then confirm that the layouts, designs, and functionalities are all working correctly. Use Google’s Mobile-Friendly Test tool to find out if Google views your site as mobile-friendly, and if not, what you can do to meet their guidelines.
- Make Sure All Integrations Work: Make sure all your integrations are working correctly. This not only includes Google Analytics and Google Tag Manager, but your CRM, marketing automation, personalization, eCommerce, live chat, and other tools needed to run your site.
- Make Sure All Social Profiles Are Updated: Go to each of your social media profiles and check that all links pointing to your website are up to date and correct.
- Make Sure Google My Business and Bing Places Are Updated: Confirm that your Google My Business and Bing Places are both up to date with new website addresses if necessary. Update any relevant information that the migration may have changed or affected.
- Check For Broken Backlinks: You’ll get a good idea of which pages have backlinks prior to launch and can cross-reference them with broken pages on your site post-launch crawl, but keep in mind tools like the links report in Search Console and Majestic as an extra set of eyes to find broken links. You can then update the backlinks you have access to or reach out to site owners to request they update backlinks to the new URLs.
Numerous points must be checked in a post-migration launch. Be mindful of all SEO and performance aspects of your website, especially the best practices put forward by Google. While this post-migration check is crucial, you should also continue auditing your website regularly (at least monthly to quarterly).
21) Measure Performance Post-Launch
This goes beyond hitting the "Go live" button and turning away. You'll first want to make sure that the site launched properly, no pages are broken, and the above tasks are completed. From there, watch your Google Analytics over the next week to month. Make sure pages are getting search traffic, watch engagement metrics, and check your page speeds across various devices and browsers.
Beyond that, keep track of your keywords and their organic visibility.
- Ranking Performance: Prior to migration, your site was ranking for keywords and searches that visitors used to find your website; you’ll likely want to keep those rankings so they continue sending traffic to your site. Make sure you’re tracking your keywords using tools like Moz Pro and SEMRush, and comparing your visibility performance for those keywords both pre- and post-launch. If they increase, great — but if they decrease, you’ve got some work to do.
- Organic Traffic Users/Sessions: Check your organic traffic in Google Analytics. Take a look at key pages on your website, including your homepage, service/product pages, and blog posts, to see if traffic is decreasing, maintaining, or increasing after your migration. You can do this by comparing pre- and post-migration traffic, as well as traffic year over year. Take a look at what pages are seeing the most organic traffic fluctuations. This will tell you if pages need more optimizations or if optimizations on pages with traffic increases can be templated across others for the same potential results.
- Site Crawl or Indexing Issues in Google Search Console: By now, you should have a Google Search Console profile set up and implemented on your website. This is the most direct tool you have for insights into how Google is crawling, indexing, and ranking your website. Check Crawl Errors in Search Console regularly so you can stay on top of errors Google finds on your site. Also check your Indexing Report to ensure URLs on your website are being indexed and staying put, especially as you add content.
- Backlink Profile: See if all backlinks are working properly and aren’t broken or redirecting. Regularly audit your backlink profile to ensure it contains high-quality backlinks, and not spam or irrelevant ones. This should be done at least quarterly.
In addition, pay attention to 404 page traffic in your Google Analytics post-launch so you can quickly catch and add additional redirects to your 301 redirect file. Doing this also helps you track missing pieces of content that you may have overlooked in your migration.
22) Track 404 Pages in Google Analytics
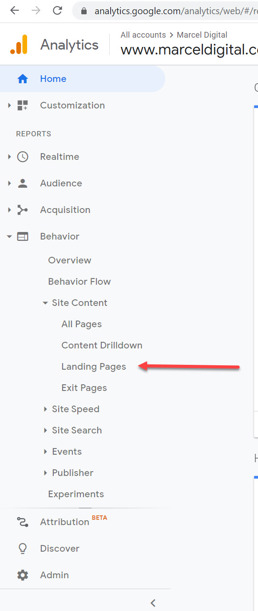
Implement and optimize a 404 page so that when a user encounters a broken page, they land in a place that tells them that page doesn’t exist. The optimized 404 page gives them options to either search for the content they were looking for or go to other pages on the website. In order to track 404 pages in Google Analytics, first make a 404 page with a page title. For Marcel Digital, we use “Page Not Found.” Here’s how you do it.
First, open your Landing Page report under Site Content in Behavior reports.
Set the date in Analytics for the time since you launched your website.
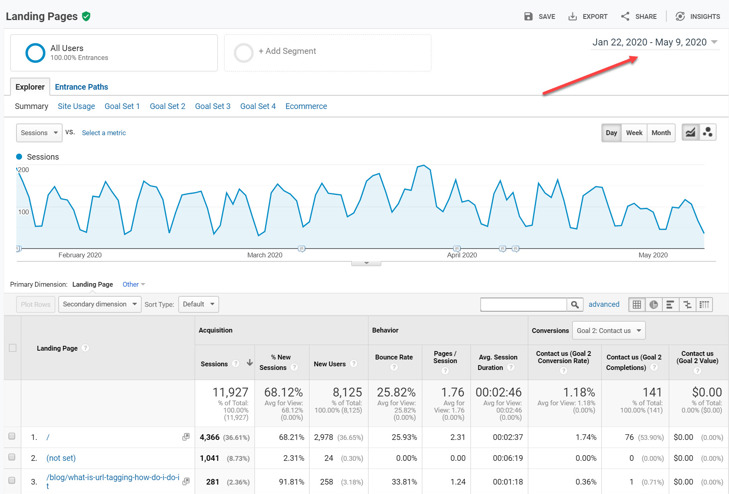
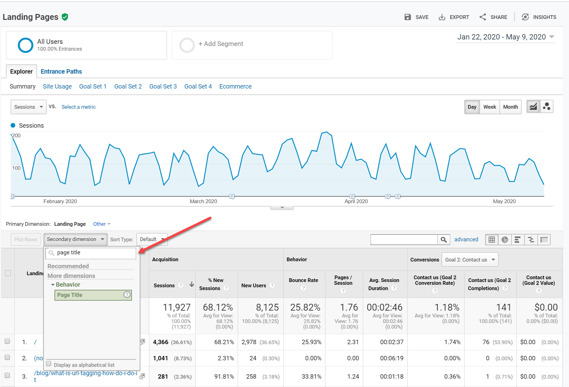
Set the secondary dimension to “Page Title.”
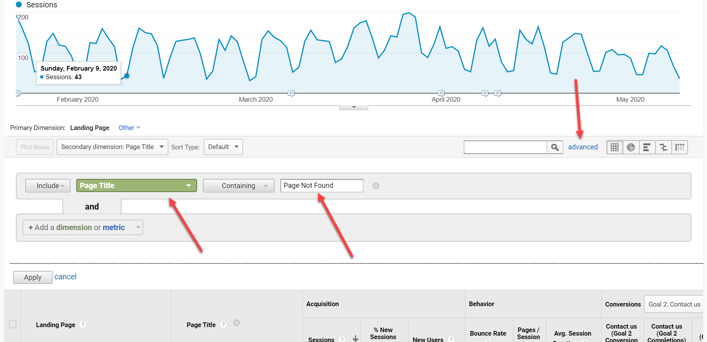
Set up an advanced filter to find “Page Title”s with “Page Not Found” or whatever your 404 page title may be.
You’ll then see a report with every URL that is being landed on with a 404.
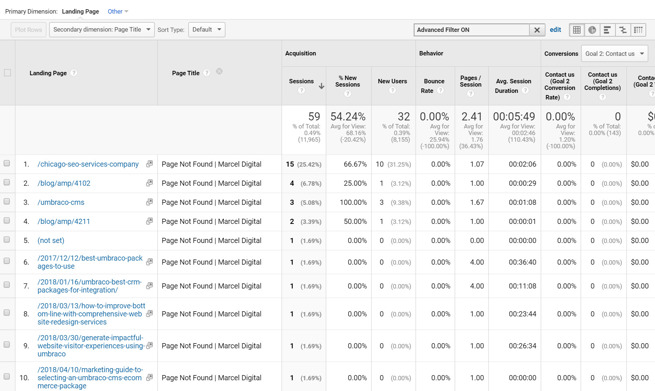
From here, you can pass along the URLs that are creating 404s to your web development team so they can properly 301 redirect them to live pages. This creates a better user experience for your website visitors and reduces broken pages on your website, making it easier for search engines to crawl.
Finding 404 Page Traffic in GA4
Afraid you will not be able to replicate this step in GA4? Not to worry, our Google Analytics certified experts got you covered.
Finding 404 traffic in GA4 is very similar. In the GA4 platform, you will navigate to the "Pages and screens" report (Reports >> Engagement >> Pages and screens).
From there, set the Dimension to “Page title and screen class” and set “Page path and screen class” as the secondary dimension. Then you just need to search the text of your 404 page title in the search bar above.

Conclusion
A website migration with SEO considerations is no quick, small task — it takes a lot of planning, research, strategizing, execution, and measurement to be successful. You’ll need to consider many facets to maintain and increase your organic visibility post-launch. Take the time to perform the tasks above, and you’ll get the most visibility out of your SEO efforts during your site migration.
Get In Touch
Need an SEO expert to create and execute a customized strategy to drive higher quality traffic and leads to your site? Fill out our form and one of the members of our SEO team will be in touch!
SEO
About the author
Joe Stoffel
Joe knows what it takes to drive SEO results. He is an experienced SEO specialist who currently leads the SEO department and strategy at Marcel Digital.